Deploy Spring Cloud Blade
About Spring Cloud Blade
- Adopting a front-end and back-end separation model, the front-end opens two frameworks: Sword (based on React, Ant Design), Saber (based on Vue, Element-UI)
- The back-end uses the SpringCloud family bucket, and at the same time, its basic components are highly encapsulated, and a separate framework is open sourced: BladeTool
- BladeTool has been pushed to the Maven central repository, just introduce it directly, reducing the bloatedness of the project, and also paying more attention to business development
- Integrate Sentinel to protect the stability of services from multiple dimensions such as traffic control, circuit breaking degradation, and system load.
- The registration center and configuration center choose Nacos, which slims down the project while strengthening the linkage between modules.
- Minimally encapsulates the multi-tenant bottom layer, using less code to achieve a more scalable SaaS multi-tenant system.
- Drawing on OAuth2, a multi-terminal authentication system is implemented, which can control the token permissions of subsystems to be isolated from each other.
- Drawing on Security, the Secure module is encapsulated, using JWT for Token authentication, which can be extended to integrate Redis and other fine-grained control schemes.
- The project package is clear, standardizing the development model of microservices, making the division of labor between packages clear.
Module Description
SpringBlade
├── blade-auth -- Authorization service provider
├── blade-common -- Common tool encapsulation package
├── blade-gateway -- Spring Cloud Gateway
├── blade-ops -- Operation and maintenance center
├    ├── blade-admin -- spring-cloud background management
├    ├── blade-develop -- Code generation
├    ├── blade-resource -- Resource management
├    ├── blade-seata-order -- seata distributed transaction demo
├    ├── blade-seata-storage -- seata distributed transaction demo
├── blade-service -- Business module
├    ├── blade-desk -- Workbench module
├    ├── blade-log -- Log module
├    ├── blade-system -- System module
├    └── blade-user -- User module
├── blade-service-api -- Business module api encapsulation
├    ├── blade-desk-api -- Workbench api
├    ├── blade-dict-api -- Dictionary api
├    ├── blade-system-api -- System api
└──  └── blade-user-api -- User api
Deploy Spring Cloud Blade via source code
This document tutorial is based on the deployment of Spring Cloud Blade v3.5.0 version
Deploy Nacos
Deploy Nacos through the open source application store, search for Nacos standalone in the open source application store and choose to install version 2.1.2.
Deploy Redis
Deploy Redis through the open source application store, search for Redis in the open source application store and choose to install version 5.0.7.
Deploy Sentinel Dashboard
Deploy Sentinel Dashboard through the open source application store, search for Sentinel-Dashboard in the open source application store and choose to install version 1.8.6.
Initialize the database
The Nacos installed from the open source application store comes with a Mysql component, enter this component -> port -> open external service, connect through a client tool.
- Create the
bladedatabase. - Initialize table structure and data: Blade SQL
Deploy Blade backend service
- Create components based on source code, fill in the following information:
| Content | |
|---|---|
| Component name | Custom |
| Component English name | Custom |
| Repository address | https://gitee.com/zhangbigqi/SpringBlade |
| Code branch | master |
- Multiple module builds detected, enter the multiple module build page
- Before creation, on the multiple module build page -> right side modify button -> modify the startup command of each module, as follows.
- After creation, delete the default port of each component, add a corresponding new port and port alias for each component and open the internal service of the port, as follows.
- After modification, build the component.
| Component | Port | Startup command |
|---|---|---|
| blade-auth | 8100 | web: java $JAVA_OPTS -jar blade-auth/target/blade-auth.jar |
| blade-gateway | 80 | web: java $JAVA_OPTS -jar blade-gateway/target/blade-gateway.jar |
| blade-admin | 7002 | web: java $JAVA_OPTS -jar blade-ops/blade-admin/target/blade-admin.jar |
| blade-develop | 7007 | web: java $JAVA_OPTS -jar blade-ops/blade-develop/target/blade-develop.jar |
| blade-report | 8108 | web: java $JAVA_OPTS -jar blade-ops/blade-report/target/blade-report.jar |
| blade-resource | 8010 | web: java $JAVA_OPTS -jar blade-ops/blade-resource/target/blade-resource.jar |
| blade-swagger | 18000 | web: java $JAVA_OPTS -jar blade-ops/blade-swagger/target/blade-swagger.jar |
| blade-desk | 8105 | web: java $JAVA_OPTS -jar blade-service/blade-desk/target/blade-desk.jar |
| blade-log | 8103 | web: java $JAVA_OPTS -jar blade-service/blade-log/target/blade-log.jar |
| blade-system | 8106 | web: java $JAVA_OPTS -jar blade-service/blade-system/target/blade-system.jar |
| blade-user | 8102 | web: java $JAVA_OPTS -jar blade-service/blade-user/target/blade-user.jar |
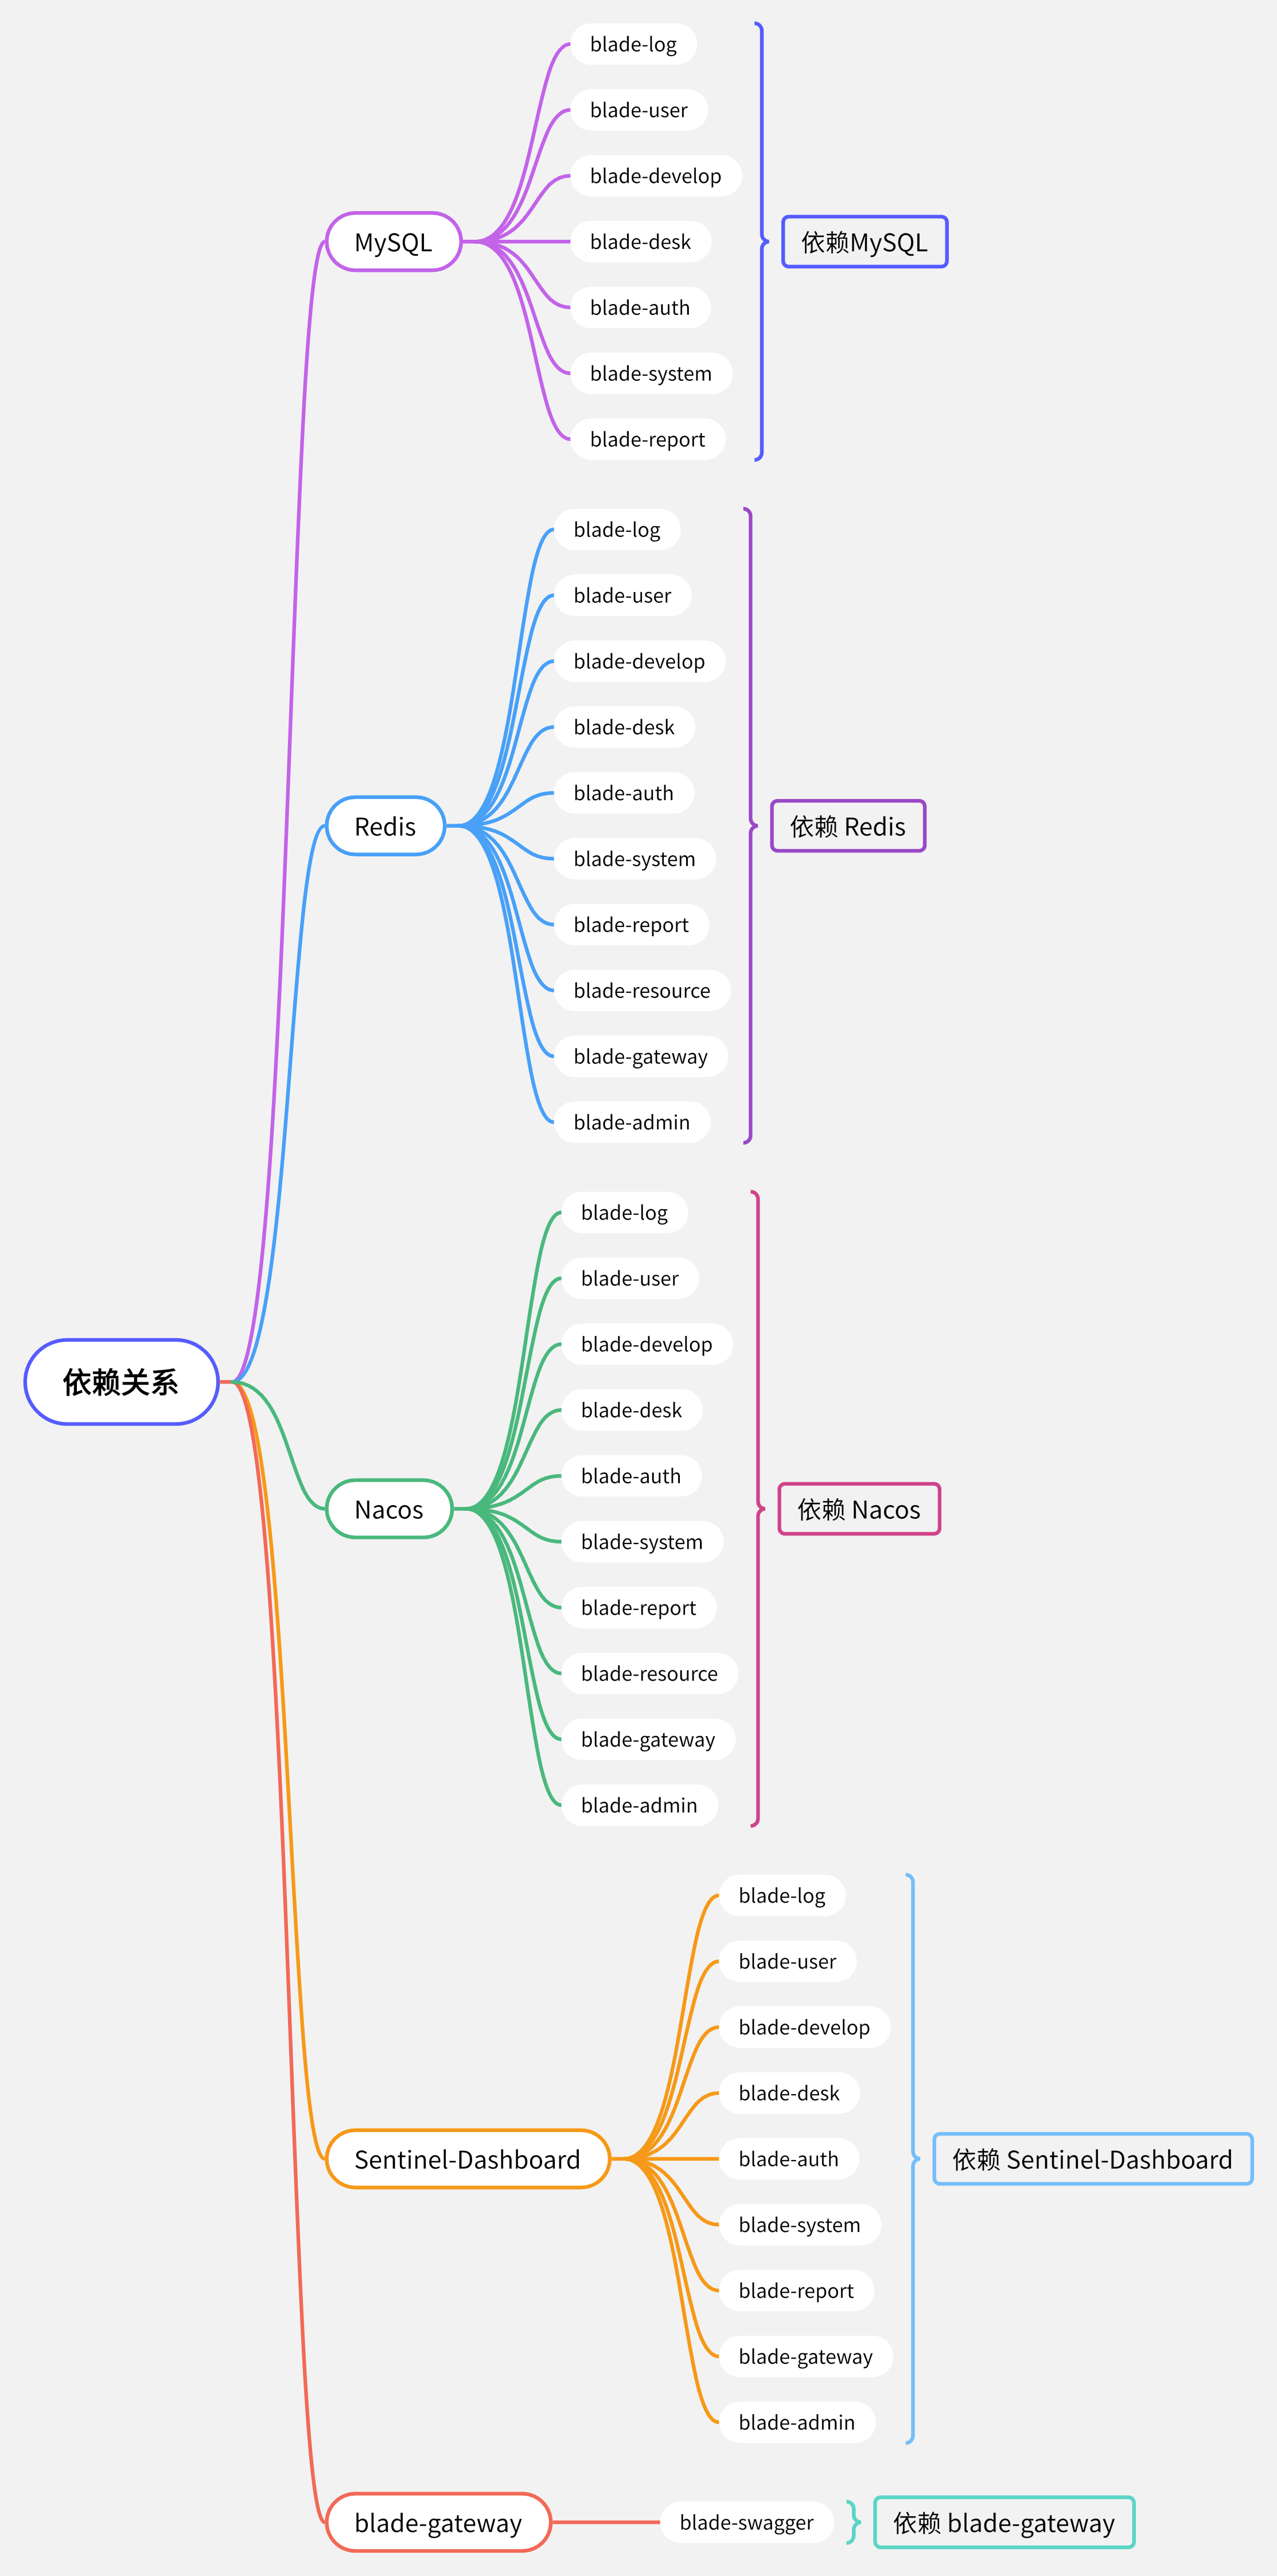
- Edit dependencies, switch to
orchestration modeto drag components to establish dependencies.
- Enter the
Nacoscomponent -> Port -> Open the external service of port8848, access Nacos and log in, default username and passwordnacos/nacos, create the following configuration file.
Create blade.yaml configuration file
#Server configuration
server:
  undertow:
    # The following configurations affect the buffer, these buffers will be used for IO operations of server connections, somewhat similar to netty's pooled memory management
    buffer-size: 1024
    # Whether to allocate direct memory
    direct-buffers: true
    # Thread configuration
    threads:
      # Set the number of IO threads, they mainly perform non-blocking tasks, they will be responsible for multiple connections, the default setting is one thread per CPU core
      io: 16
      # Blocking task thread pool, when performing blocking operations like servlet requests, undertow will get threads from this thread pool, its value setting depends on the system load
      worker: 400

#Spring configuration
spring:
  cloud:
    sentinel:
      eager: true
  devtools:
    restart:
      log-condition-evaluation-delta: false
    livereload:
      port: 23333

#Feign configuration
feign:
  sentinel:
    enabled: true
  okhttp:
    enabled: true
  httpclient:
    enabled: false

#Exposed ports
management:
  endpoints:
    web:
      exposure:
        include: "*"
  endpoint:
    health:
      show-details: always

#Knife4j configuration
knife4j:
  #Enable
  enable: true
  #Basic authentication
  basic:
    enable: false
    username: blade
    password: blade
  #Enhanced configuration
  setting:
    enableSwaggerModels: true
    enableDocumentManage: true
    enableHost: false
    enableHostText: http://localhost
    enableRequestCache: true
    enableFilterMultipartApis: false
    enableFilterMultipartApiMethodType: POST
    language: zh-CN
    enableFooter: false
    enableFooterCustom: true
    footerCustomContent: Copyright © 2022 SpringBlade All Rights Reserved

#Swagger configuration information
swagger:
  title: SpringBlade API Documentation System
  description: SpringBlade API Documentation System
  version: 3.5.0
  license: Powered By SpringBlade
  licenseUrl: https://bladex.vip
  terms-of-service-url: https://bladex.vip
  contact:
    name: smallchill
    email: smallchill@163.com
    url: https://gitee.com/smallc

#Blade configuration
blade:
  token:
    sign-key: Please configure a 32-bit signature to improve security
  xss:
    enabled: true
    skip-url:
      - /weixin
  secure:
    skip-url:
      - /test/**
    client:
      - client-id: sword
        path-patterns:
          - /sword/**
      - client-id: saber
        path-patterns:
          - /saber/**
  tenant:
    column: tenant_id
    tables:
      - blade_notice
Create blade-dev.yaml configuration file
#Spring configuration
spring:
  redis:
    ##Redis standalone environment configuration
    host: ${REDIS_HOST}
    port: 6379
    password:
    database: 0
    ssl: false

#Project module centralized configuration
blade:
  #Common development and production environment database address (special cases can be configured and overridden in the corresponding sub-project)
  datasource:
    dev:
      url: jdbc:mysql://${MYSQL_HOST}:3306/blade?useSSL=false&useUnicode=true&characterEncoding=utf-8&zeroDateTimeBehavior=convertToNull&transformedBitIsBoolean=true&tinyInt1isBit=false&allowMultiQueries=true&serverTimezone=GMT%2B8
      username: root
      password: root
Update or restart all components except Nacos Mysql Redis Sentinel Dashboard.
Six, deploy Blade front-end Saber
- Create components based on the source code, fill in the following information:
| Content | |
|---|---|
| Component name | Custom |
| Component English name | Custom |
| Repository address | https://gitee.com/zhangbigqi/Saber.git |
| Code version | v3.5.0 |
Here I used my repository address and modified the Nginx configuration.
- Enter the
Sabercomponent -> Port -> Delete the default port, add port8080and open the external service. - Edit dependencies, switch to
orchestration modeto drag components to establish dependencies, makeSaberdepend onblade-gatewayand update the component. - Use the default domain to access
Saber UIand log in.
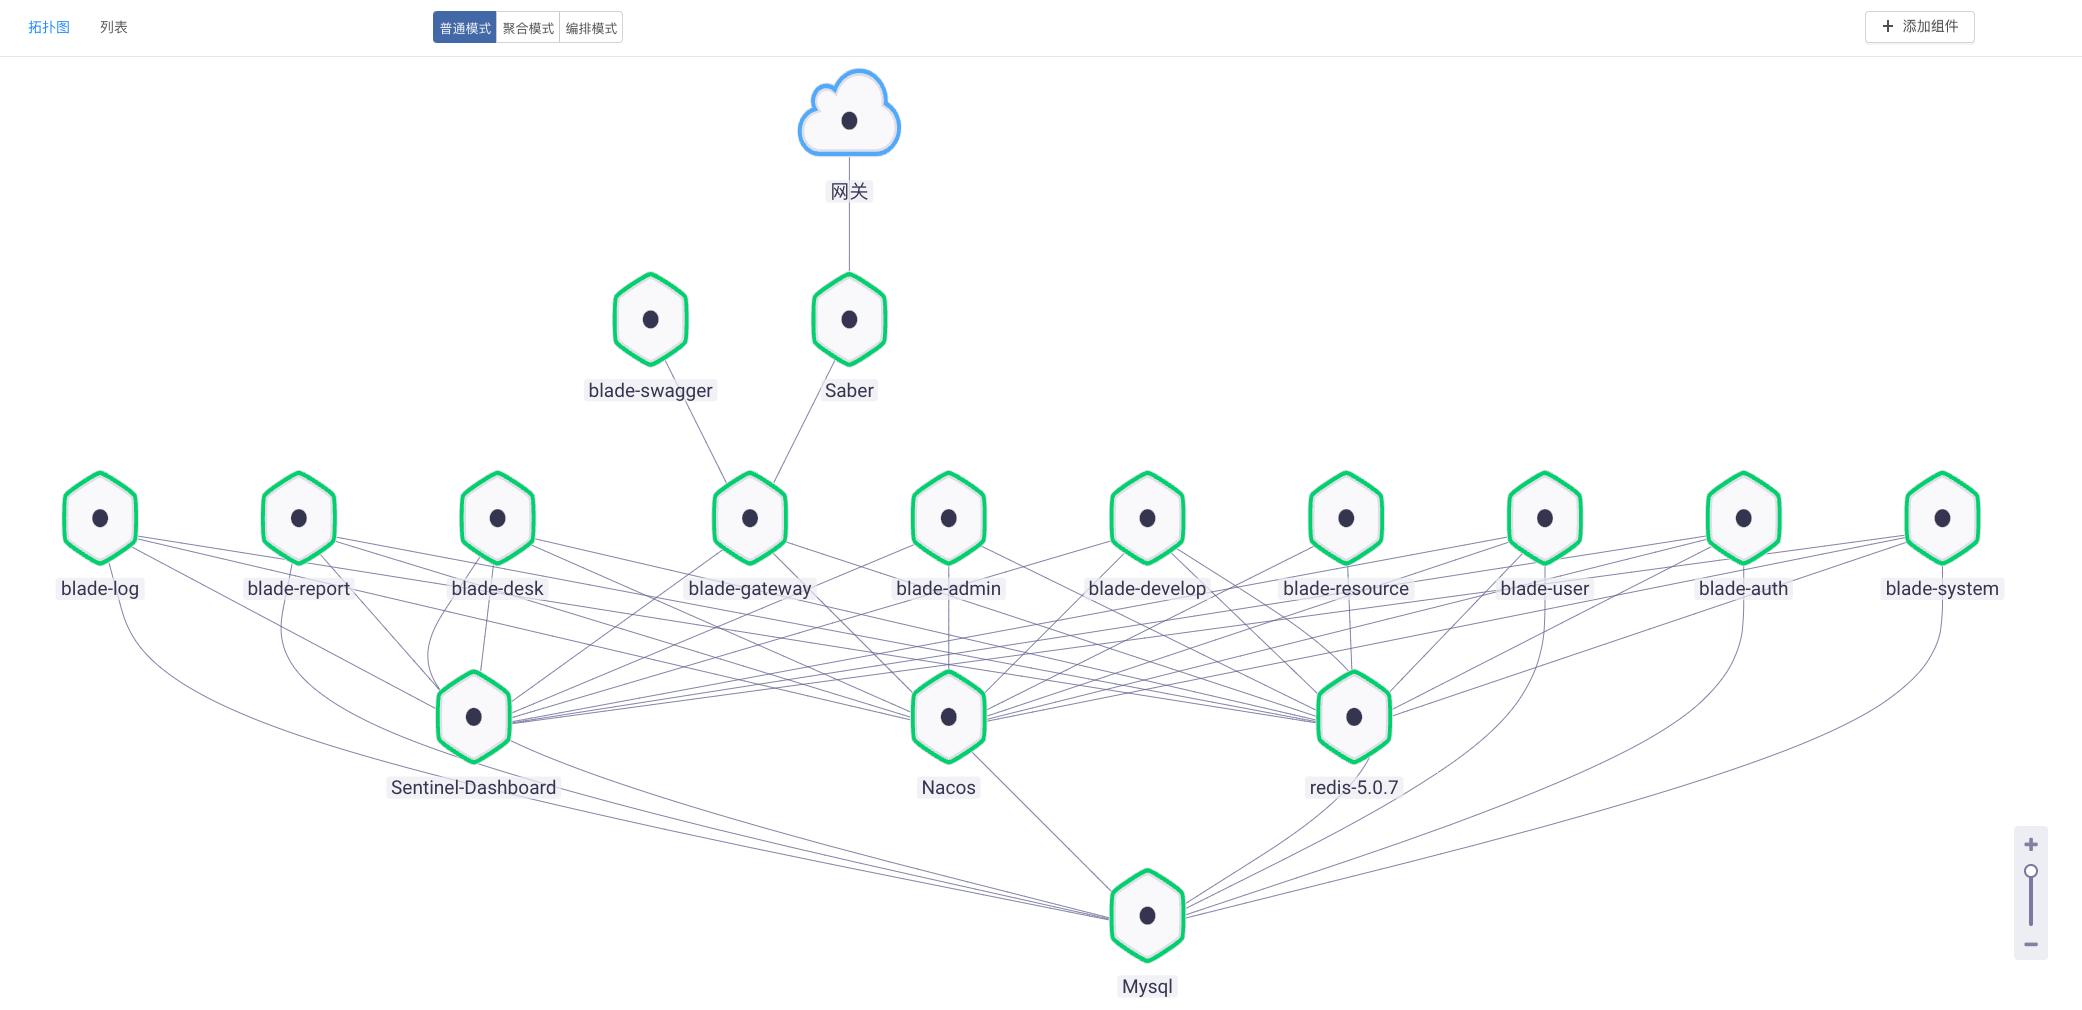
Final deployment topology